Showing posts with label VW Bus Interior. Show all posts

Friday, August 30, 2013

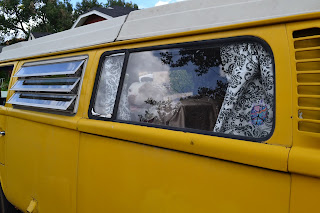
Yes, the Curtains Match the Drapes

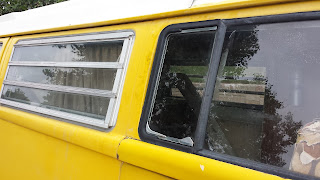
It goes to say that I'm not much of a whiz in the kitchen or on the sewing machine, for that matter.  The first is irrelevant in this situation but usually seems to go hand in hand with the second.  Penny was in desperate need of curtains, as the old ones were yellowed and could actually be described as crusty. (Yuck!)

Our first trip to the fabric store was only about a week after we had acquired our new charge.  In the midst of perusing tons of fabric bolts the 2 year old had a bit of a meltdown so we had to abandon ship.  We tried a week or two later and after much back and forth about color schemes, texture and durability we finally settled on a white and grey damask.  Eventually we want to paint Penny white with a gunmetal grey pop top, so these curtains would fit in perfectly and will look decent in her current state of school bus yellow.  (I'm sure you've caught on that I have a hard time not making stupid faces in photos...enjoy.)


 We enlisted the help of Jason's mom for her sewing expertise (as well as kitchen expertise, among many other things).  I wasn't of much assistance as the pieces were cut, measured and carefully stitched together... although I was trying to be a great cheerleader and learn a thing or two in the process!  I was a bit short in my fabric measurements so one more trip to the store for the back window curtain is on our agenda, but all-in-all they came out exactly how I imagined!


The family (including the dogs) piled into the bus for the inaugural hanging and now I'm happy to report that no one can peer in at us sleeping during our camping trips anymore!  Nothing to complain about there.


 A very big thank you to Mama Hammock for taking the time to make Penny even more awesome then she already is and for being patient with my lack of cutting and measuring skills!  The curtains came out great!  


Friday, August 23, 2013

Preface to the Maiden Voyage or What's in a Name

It's official.  The bus, Jason and I are going to go camping this weekend!  Our plan was to go on our first outing next summer once she's all spiffed up, but now that the motor is running decently we're itchy. Itchy to feel the wind blowing through our hair as we make our way to Vedauwoo at a snail's pace...all the while listening intently for any sound or bump that would indicate our motor isn't as primed for action as we thought.  Sounds like fun right?!  Personally, I can't wait.  (check out the awe inspiring-ness that is Vedauwoo if you're not familiar here)

With our weekend destination set it was time for me to get this baby camp ready.  Over the winter we will be reupholstering, turning our carpet into hardwood and refinishing the wood wall covering...HGTV here we come!  But in the meantime I needed to transform our mess of a bus into something relatively respectable, clean and most importantly, not gross.

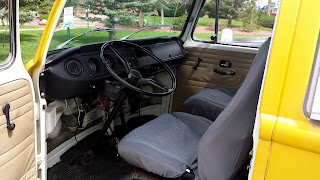
Yes, we already cleaned but that was more like degunking, now it was time for the spring cleaning to commence. As much as we'd been getting plenty of praise for our bus while driving it around town, the inside was nothing to write home about.  Ripped cloth, dirty carpet and an even dirtier dashboard and floor mats were what I was up against.


 My tools of choice were a Shop Vac, paper towels, spray and one brand new set of 600 thread count sheets that will be our temporary cushion covers (of course we have to sleep/sit in style).  Oh, and a can of Armor All which I was instructed not to use because that would be the epitome of polishing a turd.  Oh Jason, every girl deserves a facial now and again...of course she will be Armor All'd.

I turned on my Tom Petty station on Pandora (it's become my bus music)  and went to work ripping out fabric, scrubbing like Cinderella and going vacuum crazy on the carpet.  Things even started to look up just after I managed to get all of the fabric out and the cushions vacuumed.

As I was scrubbing the dirt-caked plastic floor mats in the front I was thinking about what we should name her.  We had been pondering it and had even been told by a few different people that it was time for a name.  Jason and I were pretty adamant that she had to come by her name organically and nothing had sounded just right as of yet.  And then it dawned on me as I was silently praising my bus for shining up so nice and getting excited about actually seeing crud free mats...she shines up like a new penny!  It was perfect, as Here Comes the Sun by the Beatles played softly in the background, Penny fits.  That's it!

Luckily my co-bus owner agrees, although he's still not off the polishing a turd bandwagon just yet.  Below our semi-shiny bus with her after-camp-prep clean and a new moniker!


Friday, August 16, 2013

A Budding Mechanic

So, I'm a girl.  Most people assume I'm a really girly, girl.  I must admit that I do obsess over my hair, outfits and refuse to leave the house without makeup, but I also have a pretty mean tomboy streak.  I grew up loving cars, sports and the Teenage Mutant Ninja Turtles.  That being said, I was really excited to get greasy and learn some new manly skills when this bus came into our life.

This weekend I learned things!  We're waiting on a few parts to be delivered, so we figured that it would be a good time to make some small diagnostic efforts and see how the engine is really running.  Before tackling the engine Jason and his dad took a giant pry bar to the tie rods, which were quite bent.  (Never fear...this is a temporary fix, as we are planning on ordering new ones in the very near future).  This served to quiet the squealing of the tires that was present whenever we drove it anywhere...who knew having two front tires that faced in the same direction was so important!  (Hopefully the dumbfounded looks from other drivers that clearly said, what is that god-awful noise coming from that beautiful piece of yellow machinery will cease to exist.)


I was instructed on how to use the ratchet & socket to extract the spark plugs from the engine and after a quick Google search we figured out that our particular plugs needed to be gapped to a measurement of .028".  I ratcheted, gapped, applied some thread lubricant (since they are aluminum heads) and put them back in.


Next, it was time to check the compression on the pistons.  We were shooting for between 85-90 psi on each piston for a ship-shape diagnosis.  I was optimistic (it has potential!) but readings between 75-120 made us less hopeful that the engine was not in need of a complete rebuild. 


On top of needing new spark plugs (we realized that a good set of Bosch plugs instead of the montage of different ones in there might do us some good) there are a few other diagnostic checks that we need to make before tearing the whole thing apart.  Nonetheless, it was fun to get my hands dirty and learn a little bit more about how to make this baby run!  


Monday, August 12, 2013

Surprise...It's Leaking!

If you have read the previous posts and looked through the pictures, it should come as no surprise to you that our VW bus was not watertight. The driver side of our bus came from the factory with a rear vent window that initially seemed like it was just jammed in a slightly open position.

After getting the bus home, closing the window and protecting the interior from further water damage was at the top of the to-do list (three plus years of sitting in a field with an open window had badly stained the wood paneling next to the fold out bed).

The Odyssey:

A check of the weather forecast revealed that we were in for a unseasonably wet week so, I headed outside armed with a screwdriver convinced that this was going to be an easy fix (oh the naivety of first time bus owners). It took a matter of peeling back the vent window's weather seal to reveal the cause of the frozen window. The entire upper part of the frame was rotten from years of leaking.

Well, I will just order a new one and we will have it fixed by the end of the week, I thought to myself. So, to BusDepot.com I went. Nothing. Ok, surely WolfsbergWest.com will have it, I reassured myself. Nothing. This continued until I exhausted the list of VW bus part websites. With hope dwindling and thoughts of what did we get ourselves into racing through my head, I checked the last place I could think of.

TheSamba.com, for any other VW newbies, is the holy grail of VW information. Here I began to find out that I was not the only one that was trouble finding a driver side rear vent window for a VW bus. In fact, the rear vent window is such a sought after item that there are several forums solely dedicated to hunting them down. Here is a summary of my research: Good luck finding one. With my tail tucked between my legs, I sulked back outside to cover the window with plastic wrap and duct tape.

The next day, I was telling my dad (the person that taught me everything I know about cars) how I had struck out in my attempt to locate a vent window. In typical dad fashion he began to tell me a story of a time that he helped one of his buddies restore a VW bug and that they had found the hard-to-find parts in Fort Collins from a guy named Al.

Bria and I, got to Fort Collins as fast as we could.  We tracked down Al and he proceeded to tell us that he had sold all of his VW parts long ago, but pointed us in the direction of VRBA parts just down the street. The place was closed on Sundays so the search would have to wait until Monday.

Luckily, when I called on Monday, the guy that answered the phone knew exactly what I was looking for and headed into is parts yard to pull the window for me for $75. Finally, the bus would be watertight. If you are reading this because you are looking for a rear vent window for your bus, give this guy a call. You can find his number on his website www.vrbaparts.com.

The Installation:

The driver side rear vent window is a very simple design making removal very simple. Removing the rest of the rear window is unnecessary to replace the vent window. There are two tabs on the inside of the frame that keep the vent window frame in place. From the inside of the bus, use a screwdriver to peel back the weather stripping and reveal the tabs. Next, bend the tabs back and simply push the vent window out.  If there's any rust on the body metal after the window is removed spray a quick coat of rust encapsulating paint before you put the new one in.


The installation is just as simple with one caveat. Apply petroleum jelly (thanks to the nice folks at theSamba.com, we now know that petroleum jelly eats rubber so use dish soap) to the weather stripping before attempting to re-install the window.


Once the window is in, simply bend the tabs back in place and voilĂ , you have a nice watertight window.


Friday, August 9, 2013

A Little Dirt Never Hurt Anyone

Cleaning is one of my least favorite things to do in life.  People who work with in a 500 foot vicinity of my desk can attest to that fact.  Mind you, I'm not a dirty person (I do shower) I just selfishly hate spending my time picking up after myself or others. (I realize it's not one of my better qualities)  Be that as it may, one of the first orders of business on this new acquisition of ours was a deep clean.

The bus (from here on out known as she - according to some she's temperamental like some females who are clearly not me) had been sitting, unloved somewhere in Utah for the past 3+ years.  Seems like the last time she was registered was in 1999, so more emphasis on the + part of those years.  I was expecting bugs, roadkill and other unmentionables to be stuffed in every nook and cranny, so we prepared ourselves.


After a trip to the dollar store to stock up on any and every bargain priced cleaning supply they had, we ventured in.  To my surprise it wasn't as bad as I was expecting!  No bugs, no nested creatures in the cushion foam and no STD filled used condoms (although the germs could still be lurking).


A few hours of hard scouring, scrubbing and a healthy dose of the Tom Petty station on Pandora found our bus much closer to shiny then it was before.  I would show you an after picture, but I'm not sure you would really notice a difference (dirt and rust all look the same in pictures, right?)  But nonetheless I feel much less icky sitting in the bus now then I did before and that is what I call progress.